Need help? Call us at +65 3159 3042

prices starting from $ 15.51

View Products
Promotional Products

Available with custom print in up to four colors.

View Products

How to reach us

+65 3159 3042

social media

Print n

Please follow our artwork preparation guidelines to ensure that your artwork file is set up correctly.

  • 1. Add 3 mm of bleed

    During the production of paper products, slight cutting imperfections are to be expected - cutting can be off by a couple of millimeters from the cutting line. To allow leeway for such imperfections, you should add 3 mm of bleed on all edges of your artwork. Make sure all colors, background pictures, and elements extend to the edge of the bleed area, to avoid the appearance of white borders on certain edges after cutting. Learn more how to set up the bleed here.

  • 2. Keep your content within a 3 mm safety margin

    To ensure that no important elements (text, graphics, images) get cut off from your paper product, make sure to keep such elements at least 3 mm away from the edge of your finished product dimensions. Click here to know how to set up 3 mm safety margin.

  • 3. Use CMYK colour mode

    Except for silkscreen and pad printing, files should be prepared in CMYK colour mode. Keep in mind that if the setup is wrong, colours on the finished product may differ from the file you sent. Here is how to set your artwork to CMYK colour mode in Adobe Illustrator.

  • 4. Use an image resolution of at least 300 DPI

    To avoid blurriness, use only images and graphics that have a resolution of 300 DPI or more at actual size. Before sending your files, make sure to embed your images into the file. Read more about how to check the resolution of your assets.

  • 5. Use the right values for grey elements

    When setting up grey elements, set the black color (K) to a percentage between 0 and 100, and keep all other colors (C, M, and Y) equal to 0%.

  • 6. Use the right values for black elements

    When setting up black text, thin lines and small elements, use pure black, (i.e. C = 0, M = 0, Y = 0, K = 100). Text, thin lines, and small elements in pure black color should be set to overprint to avoid white gaps around the text. It will give a solid edge to those elements.

  • 7. Use maximum 2 colours for lines that are finer than 2 pt

    If lines are 2 pt thick or less, use only 1 or 2 colours. 4 colours may be used for thicker lines.

  • 8. Convert all fonts to outlines, or embed them in your file

    To avoid issues with fonts when submitting your file(s), make sure to convert fonts to outlines, or to embed all fonts when saving to PDF.

  • 9. Save and upload your artwork files as PDF/X-1a

    The best format for submitting print-ready files is PDF, under the PDF/X-1a standard. Where possible, submit your files in PDF format. See why PDF/X-1a is the right format for printing.

  • 10. Check for overprint

    Make sure that no elements are set on overprint, unless you need them to be.

Our free templates provide you with all the information you need to correctly prepare your artwork files for printing. Simply download the template that matches your desired product configuration.

If you have any questions about the product and ordering process, please have a look at our Frequently Asked Questions (FAQ) Click here!. If can't find your question in our FAQ section, you can reach our friendly customer support on +65 3159 3042.

  • 1. What is the fastest delivery for n?

    The fastest delivery time for n is d. Please note that you have to submit your order before 11:00 AM (AEST). Late payment or upload of your artwork might further delay your order. If you select Online Proof or Digital Proof Print during the checkout process, the production will only begin after your approval.

  • 2. Which production techniques are used?

    Depending on the quantity that you order, we use either digital or offset printing. In any case, we rely on the most technologically advanced printing equipment to guarantee the highest printing quality for our business cards.

  • 3. How will my product be delivered?

    All of our products are delivered in a securely packed cardboard box.

  • 4. I can't find what I'm looking for. Can I request a quote?

    If you can't find what you need, please call our customer service team at the above-mentioned number to help you place an order. You can also request a quote from our customer service team for special product configurations that are not available on our website.

  • 5. How can I upload my files?

    If your artwork contains more than one page, you can either upload a single file which contains all pages, or upload separate files each containing one page. Your file(s) can be uploaded either before you checkout and pay, or after. Please note that uploading files late might result in a moved expected delivery date.

  • 6. Which formats can I upload?

    The best format for submitting print-ready files is PDF, under the PDF/X-1a standard. Learn how to save your artwork using PDF/X-1a standard in Adobe Illustrator. However you can also upload your file in JPEG, PNG, PSD, EPS, TIFF or AI format for an additional fee of SGD 10.00. Our graphic designers will then convert your file into a print-ready PDF file.

1 . Choose Service Type

2. Choose Your Options

    • * Width must be between 5 cm and 10 cm
    • * Height must be between 15 cm and 30 cm
    • * Your number of pages is not available.

Format

Size (Width x Height)

Print Both Sides

Full Color Front & Back

Print One Side Only

Full Color Front Only

Paper type

Finishing

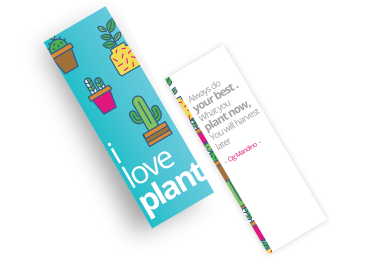
Details about ordering Die Cut Bookmarks

  • Please note that you are required to upload artwork in PDF format with CMYK color mode. Only vector image is printable.
  • Please follow our artwork guidelines, to ensure an optimal print result.
  • If you would like to order business cards for multiple people at once, please follow these guidelines.
  • Looking for design service do look:

    here!

Die Cut Bookmarks

Let us design

Change to other services
  • ProductDie Cut Bookmarks
  • Paper type260g Art Card
  • Format5 x 15 cm
  • PagesFront & Back
  • ColorsFull Color Front & Back
  • BookbindingCutting
  • FinishingNone
  • RefinementNone
  • Quantity
  • Expected delivery

        Request Paper Sample

        Request our sample box for free ! Learn More

        Product Details Die Cut Bookmarks

        Print Bookmarks Online

        ใช้ที่คั่นหนังสือของเราทำอะไรได้บ้าง
        • โปรโมทธุรกิจคุณในวิธีแบบดั้งเดิม
        • สื่อสารแบรนด์และข้อความให้เข้าถึงผู้คนในชีวิตประจำวัน
        • แชร์รูปถ่าย การออกแบบ การลงสี และอื่นๆในรูปแบบที่มีประโยชน์
        • 310g Art Card paper
        • 310g Art Card paper:

          310g Art Card paper will give your Bookmarks a high class and premium feel. Perfect if you want to stand out. This paper will generate a high quality appeal, placed on any welcome desk, leaving a mark on your customers.
          Reflect the quality and premium aspect of your company, and make a lasting impression.
        • 260g Art Card paper
        • 260g Art Card paper:

          260g Art Card paper offers some of the advantages of our 310g Art Card paper, but at a lower cost. Picking 260g Art Card paper is a good way to limit cost for your Bookmarks while maximizing the sensory impact of your vision.

        • Glossy Lamination
        • Glossy Lamination:

          Lamination consists of a thin plastic film covering your product and protecting it against water, scuffs, and worn edges. This is crucial for tags, which will be attached to products and therefore need to be solid. Choosing Lamination adds elegance and quality to your products, emphasizing your own standards. Glossy Lamination reflects light, and will give colors more pop and vibrance.
        • Matte Lamination
        • Matte Lamination:

          Lamination consists of a thin plastic film covering your product and protecting it against water, scuffs, and worn edges. This is crucial for tags, which will be attached to products and therefore need to be solid. Choosing Lamination adds elegance and quality to your products, emphasizing your own standards. Matte Lamination almost completely eliminates glare (light reflection) issues, and gives your cards a classy, smooth touch.
        • Rounded Corners
        • Rounded Corners:

          Rounding the corners of your tags conveys your more creative side, while at the same time setting your tags aside from the mass of squares. In addition, it will keep them looking fresh for a longer period of time!

        • Matte Lamination & Rounded Corners
        • Matte Lamination & Rounded Corners:

          Enjoy the benefits of matte lamination and rounded corners at the same time! Rounding the corners of your tags conveys your more creative side, while at the same time setting your tags aside from the mass of squares. In addition, it will keep them looking fresh for a longer period of time!

        • Glossy Lamination & Rounded Corners
        • Glossy Lamination & Rounded Corners:

          Enjoy the benefits of matte lamination and rounded corners at the same time! Rounding the corners of your tags conveys your more creative side, while at the same time setting your tags aside from the mass of squares. In addition, it will keep them looking fresh for a longer period of time!

        ทำไมพิมพ์ที่คั่นหนังสือออนไลน์?

        ทุกคนคงจำสถานการณ์นี้ได้ คุณกำลังอ่านหนังสือที่ดีมากเล่มหนึ่ง กำลังอินไปกับเรื่องราวในหนังสือ แต่แล้วก็ต้องหยุดอ่านด้วยเหตุผลต่างๆนานา ไม่ว่าจะเป็น ต้องทำอาหาร อาบน้ำ นอน หรือต้องรีบออกจากบ้าน  แล้วคุณจะจำได้อย่างไรว่าคุณหยุดอ่านหนังสือที่หน้าไหน? คุณจะพับมุมหน้ากระดาษซึ่งเป็นการทำให้หนังสือเล่มโปรดของคุณเสียหายเหรอ? คุณจะใช้กระดาษสักใบที่หาเจอแถวนั้นมาคั่นหนังสือเหรอ?  คุณจะเดินทั่วบ้านเพื่อหารูปสุดโปรดมาคั่นหนังสือหรือเปล่า? หากคุณมีที่คั่นหนังสืออยู่ในมือ คุณก็โชคดีมาก แต่ปกติแล้วเวลาคุณจำเป็นที่จะต้องใช้ที่คั่นหนังสือ คุณมักจะหามันไม่เจอ เนื่องจากคุณอาจลืมที่คั่นหนังสือไว้ในหนังสือสักเล่ม หรือที่คั่นหนังสืออาจตกหล่นอยู่ในกระเป๋าของคุณ  อย่างไรก็ตาม การมีที่คั่นหนังสือมากมายอยู่ในบ้านก็เป็นเรื่องที่ดี

        นับว่าเป็นบทเรียนสำหรับคุณและบริษัทของคุณว่าที่คั่นหนังสือเป็นสิ่งที่คนจำเป็นต้องใช้  เป็นผลิตภัณฑ์สิ่งพิมพ์ที่สามารใช้สื่อสารข้อความทางการตลาด หรือใช้สำหรับแชร์ภาพถ่าย งานออกแบบ และทักษะด้านต่างๆของคุณได้  และนี่คือสาเหตุว่าทำไมการพิมพ์ที่คั่นหนังสือจึงมีประโยชน์ต่อธุรกิจคุณ  ไม่ว่าคุณจะเป็นบริษัท นักวาด หรือใครก็ตามที่ต้องการแชร์รูปภาพและข้อความให้เพื่อนๆและคนใกล้ชิดได้เห็น  การพิมพ์ที่คั่นหนังสือเป็นการสร้างสิ่งที่มีประโยชน์ที่สามารถนำมาใช้ได้ในชีวิตประจำวันและทำให้คนอยากที่จะเก็บที่คั่นหนังสือเอาไว้  คุณสามารถแจกที่คั่นหนังสือให้กับทุกคน ทุกเพศ ทุกวัย  และยิ่งคุณแจกที่คั่นหนังสือหลายๆใบต่อหนึ่งคนก็ยิ่งดี เพราะเป็นการทำให้แน่ใจว่าคนจะเก็บที่คั่นหนังสือไว้นานกว่า

        จากมุมมองทางด้านการตลาดสำหรับธุรกิจคุณ การพิมพ์ที่คั่นหนังสือคุณภาพดีเป็นโอกาสที่ดีในการเข้าถึงกลุ่มลูกค้าเป้าหมายของคุณอย่างยั่งยืน  การออกแบบที่คั่นหนังสือที่ดูดีและน่าสนใจ ควรใส่ข้อมูลให้น้อยที่สุด โดยใส่แบรนด์ของคุณ โลโก้ และข้อความหรือภาพเพื่อสื่อสารการตลาด  สิ่งสำคัญคือคุณไม่ควรใส่ข้อความมากเกินไป เพราะผู้คนคงไม่อ่านหรอกเพราะเขากำลังอ่านอย่างอื่นอยู่  ในการทำให้ที่คั่นหนังสือแบรนด์คุณดูดี สัมผัสดีและน่าสนใจ คุณต้องมั่นใจว่าที่คั่นหนังสือของคุณมีความคงทน โดยการเคลือบลามิเนตแบบด้านและตัดขอบมน ซึ่งจะทำให้ที่คั่นหนังสือมีสัมผัสเรียบลื่น ดูสดใสและแปลกใหม่

        หากคุณเป็นนักวาด ไม่ว่าจะเป็นนักวาดมืออาชีพหรือมือสมัครเล่น  การพิมพ์นามบัตรโดยมีลวดลายงานออกแบบของคุณเป็นวิธีที่เยี่ยมมากในการให้ของที่ระลึกสวยๆกับเพื่อนๆและครอบครัวของคุณ หรือขายงานออกแบบของคุณให้กับผู้คนจำนวนมากที่ชื่นชอบผลงานของคุณ  ที่คั่นหนังสือของคุณน่าจะมีภาพมากมาย ไม่ว่าจะเป็น รูปภาพ ภาพถ่าย หรือข้อความสั้นๆ  ตัวเลือกที่ดีคือคุณควรเลือกการเคลือบมันหรือเคลือบยูวี  เพื่อให้แน่ใจว่าที่คั่นหนังสือของคุณมีสีสันสดใสและงานของคุณดูมีชีวิตชีวา  การเคลือบทั้งสองแบบนี้ช่วยให้ที่คั่นหนังสือของคุณมีความทนทานและป้องกันการฉีกขาดได้

        พิมพ์ที่คั่นหนังสือออนไลน์กับ Gogoprint ช่วยให้คุณสามารถเลือกตัวเลือกมากมายได้ เพื่อให้แน่ใจว่าผลิตภัณฑ์สิ่งพิมพ์ของคุณจะออกมาตามที่คุณต้องการ ในราคาถูก  โดยคุณสามารถเลือกกระดาษหลายประเภท หลายขนาด และเลือกการเคลือบที่ต้องการบนที่คั่นหนังสือของคุณ  คุณสามารถสั่งพิมพ์ที่คั่นหนังสือจำนวนตั้งแต่ 100 ถึง 10,000 ชิ้น แต่จำไว้นะว่าที่คั่นหนังสือหมดเร็วมาก ทางที่ดีที่สุดคือคุณควรจะให้ที่คั่นหนังสือสองชิ้นต่อหนึ่งคน เพราะมีแนวโน้มที่คนจะไม่ค่อยเก็บรักษาที่คั่นหนังสือและทำหายในระยะเวลาอันสั้น  เพื่อความสะดวกของคุณ สั่งพิมพ์ออนไลน์กับ Gogoprint เพื่อรับที่คั่นหนังสือคุณภาพดี ราคาถูก และมีบริการส่งฟรีและส่งด่วนทั่วประเทศไทยอีกด้วย

        Die Cut Bookmarks Review & Rating

        
        0 reviews
        No Reviews
        LINE Bear

        Not Sure How to Order? Add us on WhatsApp

        Click here to talk us on WhatsApp
        Scan our QR code to get started

        Our team will help you select the right product and get your order delivered in no time.

        You can also call us

        +65 3159 3042

        Guides and Tools

        Everything you need to know to get your Artwork ready

        Please follow our artwork preparation guidelines to ensure that your artwork file is set up correctly.

        • 1. Add 3 mm of bleed

          During the production of paper products, slight cutting imperfections are to be expected - cutting can be off by a couple of millimeters from the cutting line. To allow leeway for such imperfections, you should add 3 mm of bleed on all edges of your artwork. Make sure all colors, background pictures, and elements extend to the edge of the bleed area, to avoid the appearance of white borders on certain edges after cutting. Learn more how to set up the bleed here.

        • 2. Keep your content within a 3 mm safety margin

          To ensure that no important elements (text, graphics, images) get cut off from your paper product, make sure to keep such elements at least 3 mm away from the edge of your finished product dimensions. Click here to know how to set up 3 mm safety margin.

        • 3. Use CMYK colour mode

          Except for silkscreen and pad printing, files should be prepared in CMYK colour mode. Keep in mind that if the setup is wrong, colours on the finished product may differ from the file you sent. Here is how to set your artwork to CMYK colour mode in Adobe Illustrator.

        • 4. Use an image resolution of at least 300 DPI

          To avoid blurriness, use only images and graphics that have a resolution of 300 DPI or more at actual size. Before sending your files, make sure to embed your images into the file. Read more about how to check the resolution of your assets.

        • 5. Use the right values for grey elements

          When setting up grey elements, set the black color (K) to a percentage between 0 and 100, and keep all other colors (C, M, and Y) equal to 0%.

        • 6. Use the right values for black elements

          When setting up black text, thin lines and small elements, use pure black, (i.e. C = 0, M = 0, Y = 0, K = 100). Text, thin lines, and small elements in pure black color should be set to overprint to avoid white gaps around the text. It will give a solid edge to those elements.

        • 7. Use maximum 2 colours for lines that are finer than 2 pt

          If lines are 2 pt thick or less, use only 1 or 2 colours. 4 colours may be used for thicker lines.

        • 8. Convert all fonts to outlines, or embed them in your file

          To avoid issues with fonts when submitting your file(s), make sure to convert fonts to outlines, or to embed all fonts when saving to PDF.

        • 9. Save and upload your artwork files as PDF/X-1a

          The best format for submitting print-ready files is PDF, under the PDF/X-1a standard. Where possible, submit your files in PDF format. See why PDF/X-1a is the right format for printing.

        • 10. Check for overprint

          Make sure that no elements are set on overprint, unless you need them to be.

        Our free templates provide you with all the information you need to correctly prepare your artwork files for printing. Simply download the template that matches your desired product configuration.

        If you have any questions about the product and ordering process, please have a look at our Frequently Asked Questions (FAQ) Click here!. If can't find your question in our FAQ section, you can reach our friendly customer support on +65 3159 3042.

        • 1. What is the fastest delivery for n?

          The fastest delivery time for n is d. Please note that you have to submit your order before 11:00 AM (AEST). Late payment or upload of your artwork might further delay your order. If you select Online Proof or Digital Proof Print during the checkout process, the production will only begin after your approval.

        • 2. Which production techniques are used?

          Depending on the quantity that you order, we use either digital or offset printing. In any case, we rely on the most technologically advanced printing equipment to guarantee the highest printing quality for our business cards.

        • 3. How will my product be delivered?

          All of our products are delivered in a securely packed cardboard box.

        • 4. I can't find what I'm looking for. Can I request a quote?

          If you can't find what you need, please call our customer service team at the above-mentioned number to help you place an order. You can also request a quote from our customer service team for special product configurations that are not available on our website.

        • 5. How can I upload my files?

          If your artwork contains more than one page, you can either upload a single file which contains all pages, or upload separate files each containing one page. Your file(s) can be uploaded either before you checkout and pay, or after. Please note that uploading files late might result in a moved expected delivery date.

        • 6. Which formats can I upload?

          The best format for submitting print-ready files is PDF, under the PDF/X-1a standard. Learn how to save your artwork using PDF/X-1a standard in Adobe Illustrator. However you can also upload your file in JPEG, PNG, PSD, EPS, TIFF or AI format for an additional fee of SGD 10.00. Our graphic designers will then convert your file into a print-ready PDF file.