

Step 1Choose Your Options
Need help configuring your product or preparing your artwork?
010001, Singapore
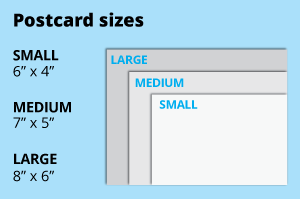
Postcards
Format
Side Of Print

Paper Type

Finishing
Spot Varnish Area

Step 2
Choose a Quantity & Delivery Date
Please select the price below to see the cutoff time. | |||
| Quantities | Get It By Mon, 29 Apr | Get It By Tue, 30 Apr | Get It By Thu, 2 May |
| 50 pcs | |||
| 100 pcs | |||
| 200 pcs | |||
| 300 pcs | |||
| 500 pcs | |||
| 1,000 pcs | |||
Can't find the quantity you're looking for? You can add a custom quantity you want | |||